We are talking of astrophotography. Usually to keep an object in the center of camera frame you need to autoguide with a secondary camera on a secondary scope or with an off axis guider. Alternatively you can use a high end mount that can keep the object in the frame without autoguiding.
I am doing astrophotography since 2002 and I have used autoguide for many years. But I have found out that several issues might happen during the night and ruin the session. Please note that I am a "couch potato astrphotographer", which means that I am doing imaging from my home terrace. I setup the scope, run the software and go to bed. In the morning I collect the images and process them.
I have planned, several years ago, to stop autoguiding and setup, together with the help of Fabio Cavicchio, the developer of Astroart, a script that might keep the object in the center of the frame, with short exposures, without autoguide.
This script works exactly like that. It has been tested with Ioptron, Vixen GP with Skysensor 2000 and Skywatcher Dobson goto mount
To use it you must have Astroart 7 installed. Connect your mount and camera to the software.
There are some things to do the at least the first time.
1 - setting up parameters needed for let Astroart doing the plate solve. Click on Tools -> Find Coordinates

Then click on the question mark and fill up your telescope focal lenght and your ccd/cmos length

Once finished click on save parameters. Remembar flip the image vertically if you are using a Newton scope

And then ok for calculate

If you see the E N sign on the top left of the image, it means that Astroart is correctly setup. Otherwise you receive an error message.
Now that we have prepeared the plate solve, let's set up the script. Before starting I assume that you are imaging only one object per night. This version of the script doesn't work with multiple objects. I have a new version coming that will do, but I have not tested yet.
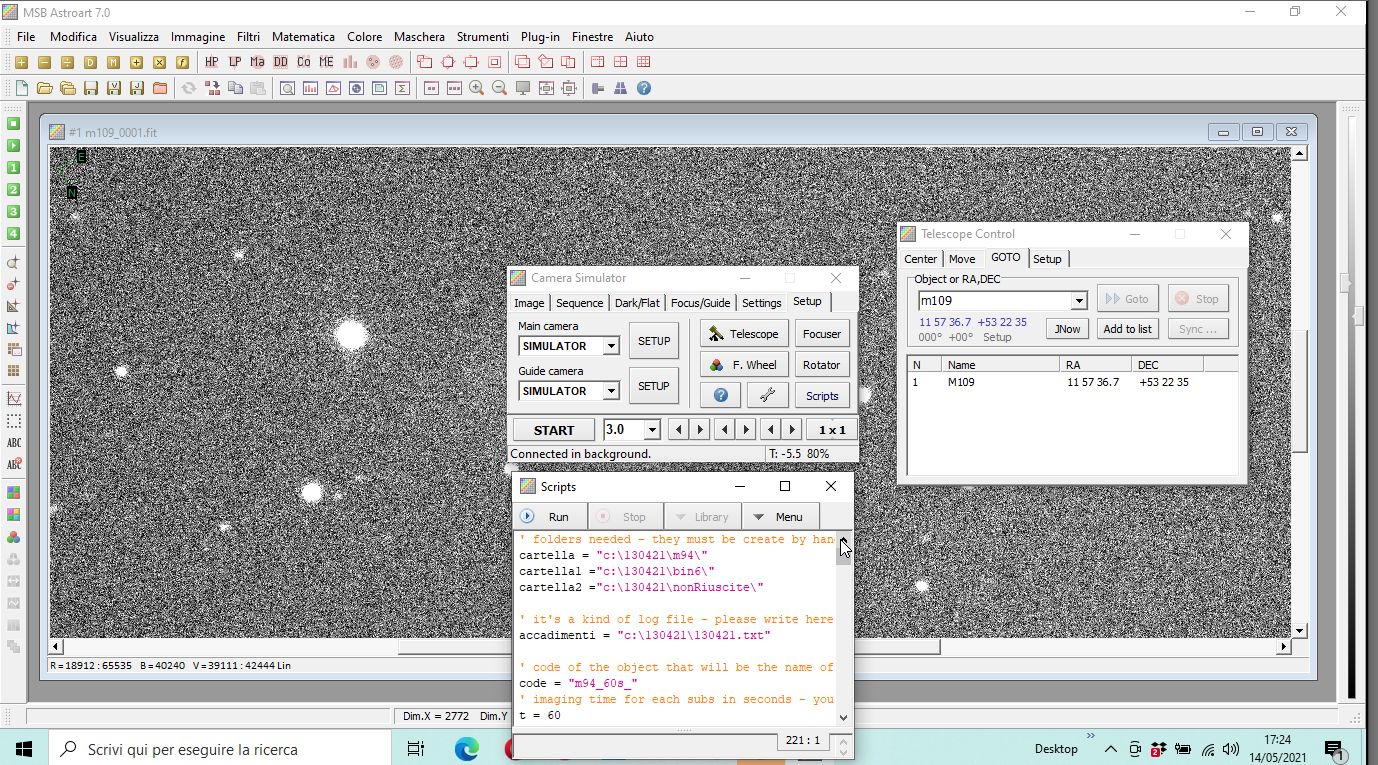
Click on Plug-in -> Camera Control -> setup your hardware (camera, telescope). Then click on Telescope Control -> goto tab -> write your object and then click on add to the list

Then click on the scripts Tab and if you haven't done already, copy and paste the script.

Before click on Run there are a few changements to do. Everything is commented in the script. However I explain below
1 - make on your pc 3 folders like you see in the above image, changing the names among the quotes. If you are imaging today, 14th of May 2021, change 130421 to 140521. If you are using windows notepad, you can use the search and replace function. Than make a folder named like the object you are imaging (like m94 in the above screen shot).
2 - change the code - in the above example is "m94_60s" - This will be the name of the sequence of the files produced during the night
3 - change exposure time - in the example above is 60 (t = 60)
4 - change exposure number - in the script actually is 2400 (totale = 2400)
That 's it.
Usually before starting the script I make a goto with Astroart and then center the object (check Astroart help - but you should click on center tab on camera control and then goto PlateSolve tab. Do a short exposure to check and then click on Run the script.
Finish
This script is set to do bin 2 exposure. You can change it...see the comment in the script to find where. Is set to do an 8 secs exposure to center the object. You can change that as well...you can find it following the comments in the code.
VERY IMPORTANT -> as I am imaging with a Newton the script flip vertically each image. If you are using a different scope you have to cancel this line or disabling it adding this symbol ' . It will change the code to comment. Instruction is Image.FlipV:

Script che be see from here: